 |
| EarthBound owned by Nintendo. Images used for educational purposes only. |
Happy Happy Village - Enemies
- Land of the creepy and the blue. Happy Happy Village is populated by Insane Cultists, enemies that dish out decent amounts of damage and often call for help. Try not to get overwhelmed.
- South of the entrance is a girl who will dash at you if you come to close. She’ll ask for donations. Give her at least a dollar and she’ll give you a Picture Postcard. Try to ignore her and she’ll follow you around until you enter a building.
- In the southwest of Happy Happy Village is a large building that serves as the local Hotel. Speak to the man inside and you can stay for $50. Once you solve the problems of this place he’ll let you stay here for free.
- A house on the east side of the Village is the home of a doctor, a nurse, and, just outside, a blue-haired healer. Use them as you see fit.
- Also in the east is a cave. This leads to Ness’s second My Sanctuary location. You can probably survive the trip through it now, but you should wait until you have a second party member. You’ll be getting her (!) soon.
- To the left of the cave is a small, unattended market where you can pick up Bananas and Fresh Eggs. You’re allowed to pay as much as you like for items, but an Unassuming Local Guy will attack if you fail to pay. Trust indeed. North of here is a Drug Store where you can purchase some new equipment for Ness.
- Beside the Drug Store is a cave leading north. Go through and you’ll find a small cabin. Inside is the long-awaited Paula, being held captive. Speak to her and she’ll give you a Franklin Badge. While held this Badge will reflect electrical attacks. Once you leave you’ll meet a nasty surprise, and you’ll have to fight two Insane Cultists and a Spiteful Crow.
- That’s all for the outskirts of Happy Happy Village. Head for the large, central building.
Happy Happy HQ
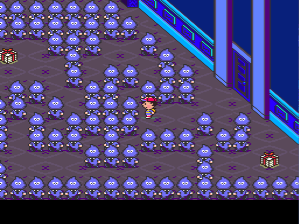
- Eeps. That’s a creepy sight. You need to weave your way through the crowd to reach the west side of this building. There are several presents in this place, but you have to go out of your way to get ‘em - and if you just trounce the area’s boss the cultists will clear out, allowing you to collect items at your leisure. The present near the door contains a Croissant; the present in the middle of the room contains a Skip Sandwich.
- To get through you need to watch the movements of the cultists and speak to the cultists that don’t match step with the rest. There are also telltale gaps beside certain members indicating that they’ll move if you speak to them. The first is down and to the left from the door…
- … the second is a short ways west and up…
- … the third is just north of the last…
- … and the fourth is a short ways southwest of the present. In front of him is another cultist whom you’ll have to kill to continue.
- Head up the stairs. You’ll find a man in front of a possibly-familiar statue. Walk up and speak to him with the Franklin Badge in your equipment and you’ll get into a fight.
Mr. Carpainter
HP: 262
Carpainter might be tough if not for the Franklin Badge, which reflects his most powerful Crashing Boom Bang attacks. Without those attacks on his side he’s kind of a wimp, only capable of normal attacks, Shield A, and the occasional Lifeup A. Whomp him with normal attacks until he comes to his senses.
- Defeating Carpainter will bring Happy Happy Village back to its senses. He’ll give you the Key to the Cabin, which you can use to free Paula. She’ll then join your party, bringing a Teddy Bear along for the ride. Paula has her own inventory, effectively doubling your carrying capacity. Handy.
- Your next obligatory destination is Twoson. There’s another place you can go first, though, and since you’re already here…
Part 8: Lilliput Steps
Part 8: Lilliput Steps


